Radios — Part Two

The crystal sets I described in my last post were often referred to as “boys radios”. I had graduated to vacuum-tube radios about the time I reached high-school. The designs were still 1920’s – 1930’s vintage though. They were a natural outgrowth of crystal sets. I found the plans in the only place I knew to look, the NW room.

Radios were more advanced in the 1940’s, but they were more complex than those earlier radios. I landed on legacy vacuum-tube radios by accident, but they fit the scope of my skills and budget much better.

A marvelous, seemingly magical, trick enabled those simple old vacuum-tube designs to perform nearly as well as later designs. Operating them required more finesse, but they performed well. The trick was positive feedback. Tubes amplify radio signals to provide stronger output. A little of that output fed back to the tube’s input bootstraps the output even further. It also has the happy effect of making the radio more selective, in other words, better at separating one station from others at nearby frequencies (channels).

Type 30 vacuum tube for battery operation

The design for the first vacuum tube radio that I built used an iconic vacuum tube. I didn’t know Type 30s were venerable classics though. Several other, more modern tubes would have worked better. But that was what the plans called for.

Type 30s required three batteries to function. The “A” battery, in this case, 2 volts, heated the filament to make a cloud of electrons. The 90-volt “B” battery attracted the electrons to the plate, and the 9-volt “C” battery was connected to the grid. The grid element was located between the filament and the plate. The grid controlled the level of current from the filament and plate. The tube amplified the output of the radio by magnifying the received radio signal.

The best place to get radio parts in those days was from mail-order catalogs. They were that era’s version of buying things online. The parts for this radio cost about $5 — a bit more than the 25 cents for my galena crystal. I talked my mom into funding part of it. I ordered the parts and waited for them to show up in the mailbox.

I followed the mail-ordered plans for the radio closely after all the parts arrived. My practical knowledge about radios was rudimentary at that time. I was concerned that if I didn’t replicate the original accurately the radio wouldn’t work. Sort of a cargo cult mentality. I know now that I needn’t have been so careful. It did look nice though. Nicer than the one in the picture.

rear
Similar to the radio that I built, except mine had two tubes, and was a bit neater.

I was eager to try out this new radio as soon as I had it finished. I didn’t even connect my long antenna. I attached an 18″ piece of wire to the antenna terminal and started tuning around to see what I could find.

Instead of a tapped-coil, this radio had plug-in coils, one for each radio band. The only coil I had wound at that point was for a shortwave band. I don’t remember which one.

There are several shortwave bands above the AM broadcast band. The first station I picked up with that new radio was located in London, England. What a surprise. That told me that I had a sensitive radio set — even with only two tubes — thanks to the power of “regeneration“.

bakelite
This front view resembles my first vacuum-tube radio fairly closely

I used that radio extensively for a couple of years. I found its tuning too sensitive to the position of my hand. I thought a metal screen behind the iconic bakelite panel would fix that, and it did.

The tuning control was also too touchy. I bought a “vernier” tuning knob for the variable capacitor, and that fixed that problem. I now had a very nice 1920’s era radio.

Most radios today are based on a single digital chip. Chips look simple on the outside, but they are complex inside. Cell phones, WiFi and Bluetooth use similar radio chips. But where’s the fun in chip-based radios? You can’t experiment with the interesting parts yourself.

My 1947 copy was more worn than this 1977 handbook.
My 1947 copy was more worn than this 1977 handbook. I eventually had to wire it together.

Later on, I was in high school, and getting interested in Amateur Radio. Amateur doesn’t mean neophyte in this case. Amateurs contributed to the state-of-the-art of radio from the beginning. The American Radio Relay League is the nexus of amateur radio.

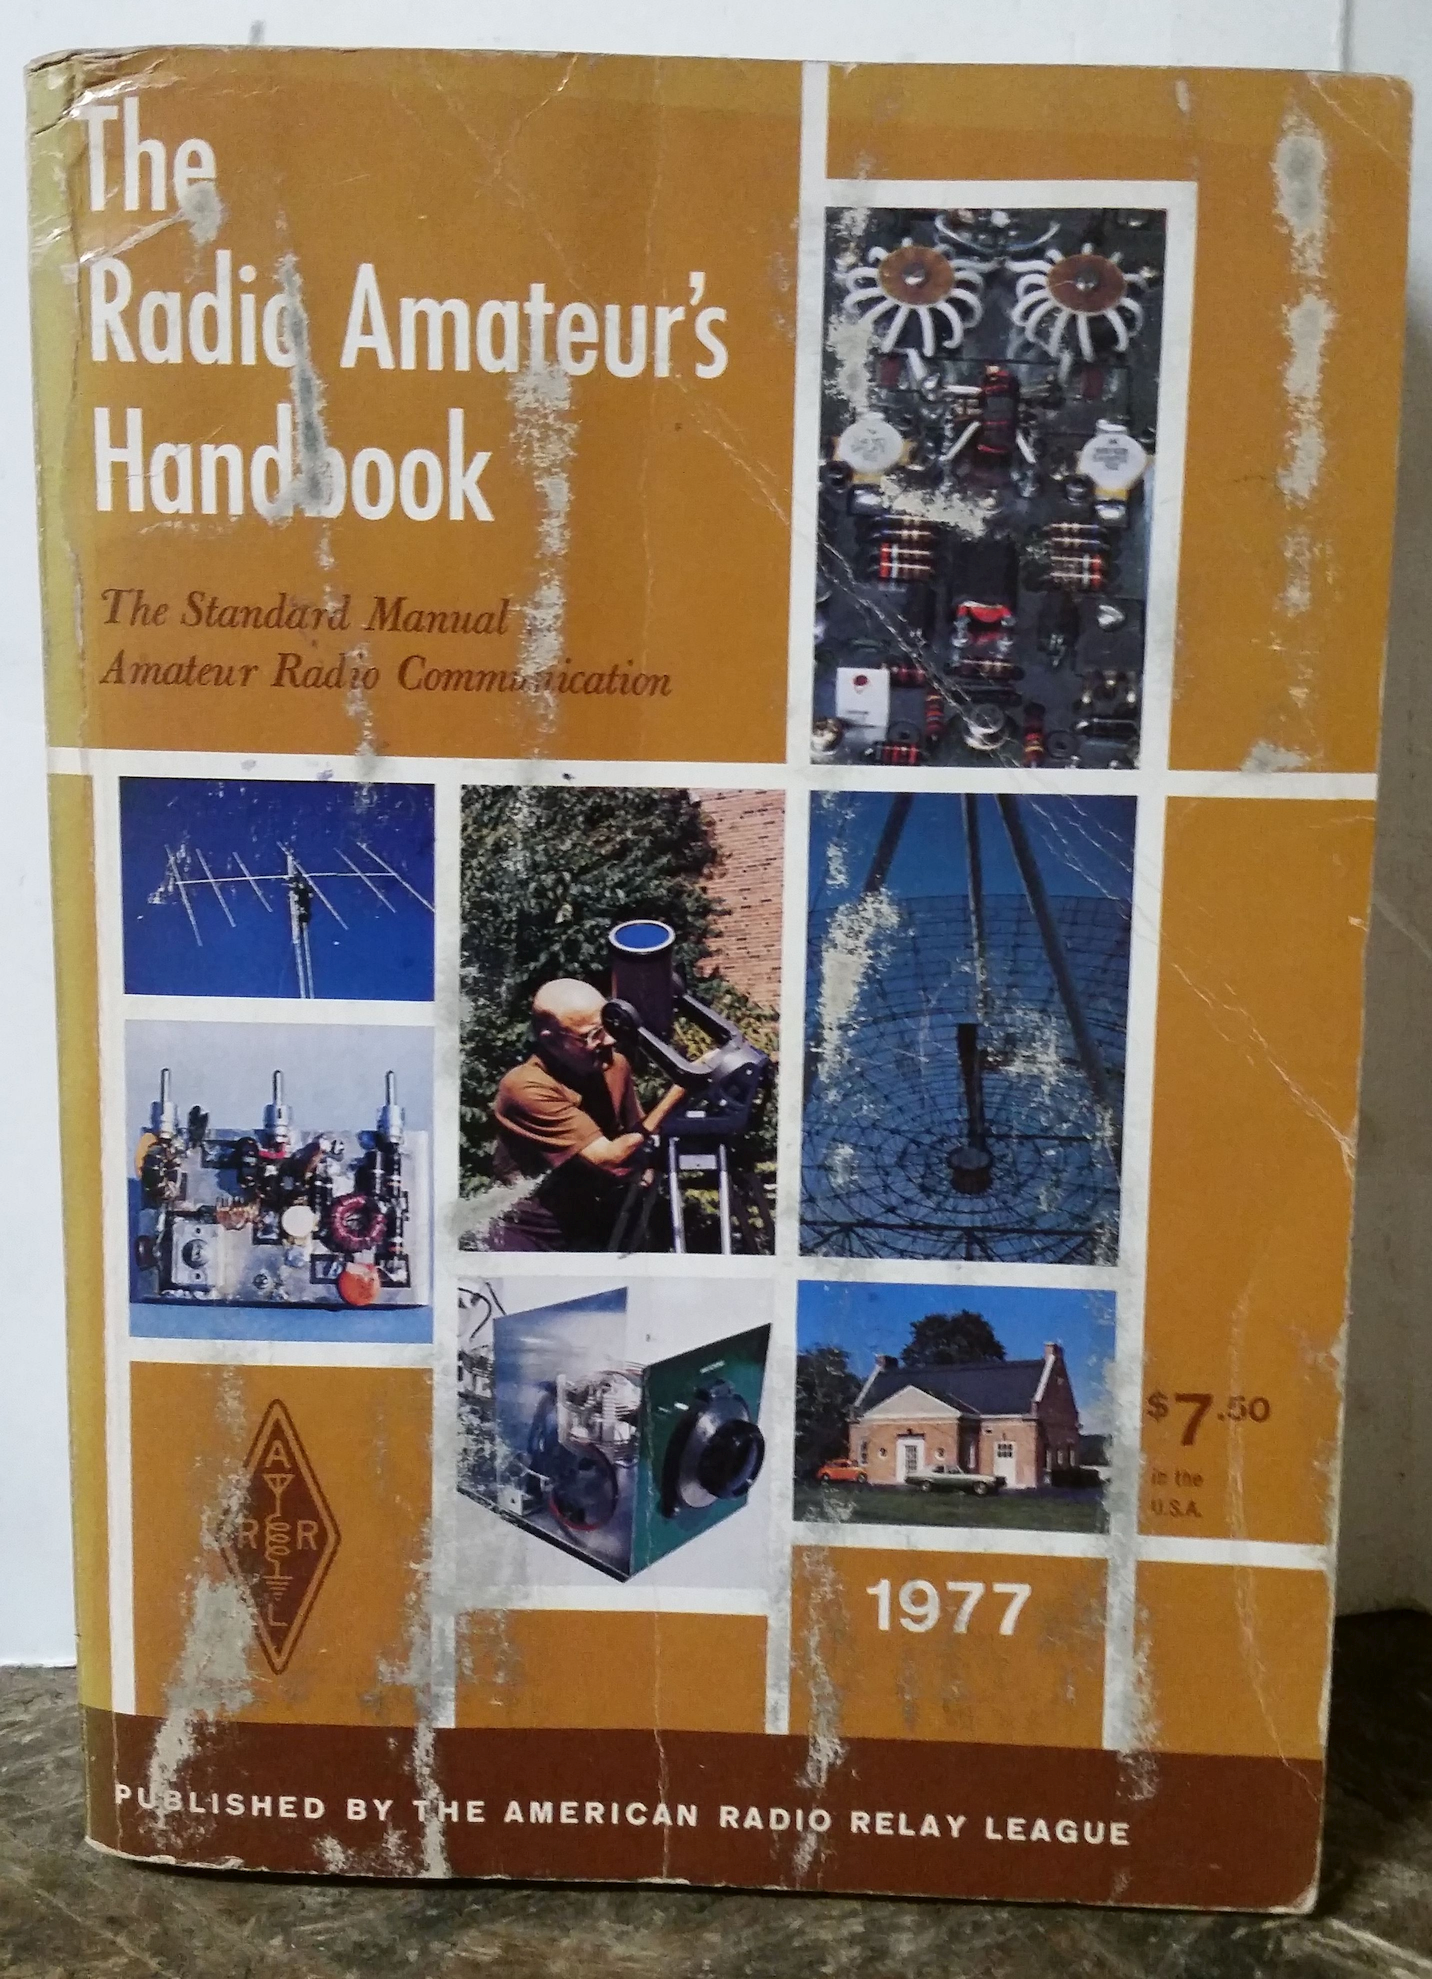
I knew nothing of The ARRL though. I had been using the 1920’s Amateur Radio book I found in the NW Room. Then one day I saw a high school classmate’s 1947 ARRL Radio Amateur’s Handbook. He let me borrow it, and I soon had a copy of my own. That handbook turned out to be more consequential for me than any other book that I’ve owned. Serendipity happens.

The ARRL logo
The Logo

The American Radio Relay League was established in 1914, which was in the early days of radio. Members of the League, and later on its technical arm, have contributed extensively to radio technology.

ARRL has been very effective in working with the FCC and Congress in setting out the structure and regulation of radio communication. ARRL is also the secretariat of the International Amateur Radio Union, serving a similar role with International radio bodies.

The ARRL handbook is just one of many publications they author and distribute for the benefit of members and the public. ARRL is a uniquely well-run organization that has been essential in keeping the regulation of radio communication out of the clutches of clueless politicians and greedy enterprises. More about Amateur Radio coming up…

Radios — Part One

I’m going to break off my aviation track briefly to initiate an engineering track. Electronics, and radio frequency engineering has always been one of my main interests. Aviation was another. Growing up during World War II, I decided that I  wanted to be a fighter pilot. However, that was never in the cards since I was too nearsighted. My interest in radios and later on engineering lead to my real career. I learned later that being a fighter pilot was not all airplanes, glory and adventure. Oh well, I found out that I was born to be an electronics engineer after all.

***************************************************

Crystal sets: Solid state radios 🙂

1945
March, 1945

My dad liked to read magazines like Scientific American, National Geographic, Farm Journal, Popular Mechanics and Popular Science.

I read them too, some of them cover to cover. I didn’t know it at the time, but an advertisement I spotted in Popular Science set me on the path to my career. I was in grade school then, so it was mid 1940’s.

Allen
The Advertisement that Started it All

The prospect of having my own radio was exciting. A quarter was a lot of money for a grade schooler, but I decided to risk it. I mailed off my 25 cents, and waited anxiously for my galena crystal and instructions to arrive.

galena
Galena Crystal (lead sulfide)

My package arrived in a week or two, and I poured over the instructions to decide which of several “crystal sets” (radios) I wanted to build. Our “NW room” upstairs was used for storage, and there were several artifacts from the 1920’s there. There was an old Victrola, three moribund radios, and a few vintage radio parts. Serendipity all over again. I decided to build the tapped coil version. Even though it seemed to be the most challenging, I thought I could build it, and it seemed to offer the best performance.

tapped
Similar to my First Crystal Set Radio

The first step was building the tapped coil. The plans called for a round Quaker Oats package, but there was a heavier cardboard tube in the NW room that I could have. One of the old radios had a multi-point switch I could use to connect the tapped coil, but it wasn’t ideal. My dad suggested that I use the rotor from the switch to build my own switch. He had some “tinner’s rivets” (small flat-headed rivets) that I could use for contact points. I cannibalized one of the ancient radio parts for copper wire of the right size, and wound the coil. I soon had the tapped coil unit assembled.

Within a couple of days I found the other old radio parts I needed, and connected them with solder. My dad told me not to use acid core solder. It works fine at first, but the residual acid eats through fine wires. A friend of his made that mistake in the 1920’s. His radio worked for three days. Rosin-core solder is what you want. I heated a four pound plumber’s soldering iron on the kitchen stove to do the soldering. Now that my crystal set was finished it was time to try it out.

All I needed now was an antenna. I knew some random lengths of electrical wire were lying around. (You never throw anything away on a farm.) I soldered enough random lengths together to reach from my bedroom window to the windmill down by the barn. I climbed the windmill tower and anchored one end of my antenna near the top. I brought the other end under the window frame of my bedroom. I also connected the necessary ground wire to the water faucet below, and brought it in too.

Catwhisker and Galena Detector

It took some fiddling to get the settings right to pick up a local station. I was using some old headphones from the NW room to listen, but I didn’t hear a whisper. I began to wonder if maybe the headphones or the crystal set itself were not working at all. I finally got one of the stations tuned in though. The main problem had been the crystal detector itself. You have to get the “catwhisker” adjusted just right for it to work. But you can’t tell if you have the whisker on the right spot unless you are tuned to a station. And you can’t tell if it’s tuned in until you get the catwhisker set right. You’re chasing your own tail.

I had lots of fun exploring the airwaves. During the day the sun ionizes the air, and ionized air soaks up radio waves. You can only tune in local stations during daylight hours. Ionization of the lower atmosphere goes away at night though, and it persists in the upper atmosphere. Radio waves bounce off the ionized upper atmosphere, and you can pick up distant stations at night. The Grand Old Opry in Nashville, KVOO in Tulsa, and a super-power US station in Del Rio, Texas (tower in Mexico) are the stations I remember.

I also built a “shirt-pocket” crystal set. It was about 3″ square and 3/4″ thick. It had a flat coil with a slider contact instead of a tapped coil. I used fine copper wire instead of string to fly a small kite, and that was my antenna. I made sure to stay far enough away from power lines though. By then I had a good grasp of radio reception basics, and was ready to try something more ambitious. I wanted to build a radio that used tubes next. That’s coming up in Part Two.

Galena (lead sulfide) is a semiconductor. The contact between the metal catwhisker and the galena crystal forms a solid state rectifier. You need a rectifier to extract sound from a modulated radio wave. So a crystal set is a solid state radio. 🙂

Nobody understood solid state physics well at the time, but Bell Telephone Labs was working on it. Three Bell Labs scientists assembled the first practical transistors in 1947. That was the true start of the solid state era. Twelve years later I was designing some of the first Hewlett-Packard products that used transistors. In essence they were precision radios used to analyze radio signals. I even met one of inventors of the transistor some time after that.

Henley Aerodrome — Powerless Flight

In my previous post, I said flying was losing its luster for me. This was before the Internet. I was reading the newspaper. I spotted an ad that offered free glider ground school at Henley Aerodrome. That is the legacy term for a flying field. You learn the basics of flight, navigation, regulations, etc., at ground school. I’d never heard of Henley, but gliders intrigued me, and I decided to take a look. Serendipity?

Henley SignGround school for gliders is similar to the one I’d been through for powered flight. Henley looked like most small, rural airports, except this one had a restaurant. The first person I met happened to be the glider instructor. I told him I had a pilot license for powered airplanes, but I wanted to fly gliders too. The instructor (I’ve forgotten his name) said, “Oh, you can learn what you need for gliders during flight training. What we need to do is get you up in the air in one.” Off we went. My instructor was a math professor at Central Washington State. He was a glider flight instructor at Henley in the summer. He said, “I can’t believe they’re paying me to do this Phil,” during the flight

Blanik TowThe most common way to launch gliders is with a towplane. It’s like towing a car. The tail of the towplane is connected to the nose of the glider with a towrope. Your ground handler — gliders only have one wheel, so you need someone to keep the wings level when you are sitting still — gives the towplane pilot a signal, and off you go into the wild blue yonder. The glider takes off first. You keep it a few feet above the runway until the towplane takes off. Then the towplane takes you up to the altitude you’ve paid for, usually 1,000 or 2,000 feet above ground level.

The glider pilot releases the towline at the agreed altitude. The towline is about 100 feet long. Both the towplane and glider have release hooks at their end of the towline. There’s less than 50 pounds of tension in the towline while ascending, so it doesn’t slow the towplane much. The glider pilot releases the towline at the agreed altitude, and banks away. After release, the towplane circles over the runway, drops the towline, and then returns for a landing. Meanwhile, the glider is off on its own. The towplane’s release hook can also serve as a safety measure in case something goes wrong.

The kind of flat-bottom clouds a glider pilot is always looking for.

What goes up must come down. Yes, but not immediately if you’re in a glider. Gliders have at least a 20 to 1 glide ratio, and some sailplanes (sleek gliders) have glide ratios as high as 50 to 1. In the glider case, 1,000 feet of altitude will let you glide 20,000 feet, or nearly four miles. That would give you nearly 7 minutes to figure out where to land. Those 7 minutes can go by faster than you’d ever think, though.

Thermal_columnIf you’re lucky you can stretch those 7 minutes to an hour, or even a few hours. With no power, your sink rate will be about 150 feet per minute. But if you can catch a thermal, which is a column of rising warm air, you’ll be lifted instead. Suppose the thermal is rising at 300 feet per minute. Your glider will be rising, not descending, at 150 feet per minute. You might gain another 2,000 feet in altitude. That would extend your flying time to 35 minutes. If you manage to do that again and again by finding more thermals you could keep going until the sun goes down. I was never up for more than hour though.

The glider I took my check ride in

You need to pass a check ride to add a glider rating to your license. My instructor was also scheduled to renew his instructor rating on the same day as my glider check ride. There was a FAA examiner there for my instructor’s check ride. One of the things you do on a glider check ride is release the towrope shortly after takeoff. There was a strong wind that day, and I worried that the emergency landing might not go well. It would involve some deft maneuvering at least. I guess my instructor was also worried. We skipped that particular task, even though the FAA examiner might be watching. No doubt my instructor figured there must be some latitude to be sensible.

There was a strong wind that day, and I was worried that the emergency landing might not go well. It would involve some deft maneuvering at least. I guess my instructor was also worried. We skipped that particular task, even though the FAA examiner might be watching. No doubt my instructor figured there must be some latitude to be sensible.

We continued to climb to altitude, did some turns and stalls, boxing the wake, etc., and then headed back to land. At that point, my instructor engaged the dive brakes and told me that was part of the check ride. Then he asked me, “What are we going to do now?” Dive brakes cause the glider to lose altitude rapidly. I knew if I flew slower it would extend the flight time, and my time to think. I told him, “We’re going to fly slow, get a feel for our rate of descent, and adjust the landing pattern to compensate.

I stalled the glider as a safety check to find out what the stall speed was with dive brakes locked. Then I started my landing pattern, which took us away from the landing strip. That was to lose altitude. We hadn’t gone far when he asked, “Don’t you think you should turn back now?” I could tell we needed to lose much more altitude, so I answered, “No we’re still way too high.” He kept urging me to turn back, and I kept saying not quite yet. I turned back when I knew we high, but not too high. Now he began to fret that we were too high, and wouldn’t get down in time. I expected that, but I had a secret plan.

You don’t usually descend with drive brakes on. But if they are on you can dive to loose altitude without picking up airspeed. (Too much airspeed would mean using up too much runway before we could land.) I dove steeply toward the near end of the runway, rounded out at a nice airspeed and landed. I’m sure he was favorably impressed, if not outright relieved. I don’t know if his anxiety was real, or just a ruse to keep me from using my own judgment. And I didn’t ask. My dive brake tactic negated his fretting in either case. He signed off my check ride in my log book, and I had my glider rating. The FAA guy didn’t say anything either. He might not have been watching.

Links

Learning to fly gliders
Thermals: Wikipedia
Gliding: Wikipedia

Learn to Fly

SFF
Spokane’s Felts Field

Soon after we moved to Spokane I learned that flight training was available at Felts Field. Being a pilot had been in the back of my mind from boyhood. I thought about it for about two minutes and decided to look into it. Felts Field Aviation had a well-structured course that would cost about $2,000 (probably $6,000 today). They offered me a free flight on the spot.

To my surprise, the flight instructor told me to taxi the airplane. Then he talked me through the takeoff. Piece of cake. I already knew how airplanes worked, but that flight gave me a chance to see how it felt to make turns, line up with the runway, read the instruments, listen to the tower, etc.  I was back the next day to take my first lesson.

172
Cessna 172

I started my flight training in a Cessna 172. More 172s have been built than any other airplane in the world. They’re all aluminum, tough and easy to fly.

Later on, Felts Field Aviation bought a Cessna 152. If 172s were Ford 250 pickups, then 152s would be Ford 150s. The 152 is small, and the maximum payload is about 520 pounds.

152
Cessna 152

I switched from the 172 to the 152 as soon as my instructor could check me out in it. I also flew my final flight check in a 152.

The examiner for the final flight check was a big guy with a few extra pounds. I  guessed his weight and calculated the maximum fuel we could have in the tanks. Otherwise, he might have dinged me for exceeding the maximum weight of 1,670 pounds.

Takeoffs, steep turns, stall recovery, operating the radio, etc., were easy for me. Flying the traffic pattern at the airport went well too. Lining up with the runway and controlling the descent took a little more finesse. Landings did not go well at all.

When landing you try to keep the airplane straight with the runway, over the centerline and flying at the correct airspeed. At the end of the descent, you reduce power and flare from descent to level flight. Now you try to keep everything stable while the airplane settles the last few feet to the runway. All that’s like keeping a hula hoop and a footsie going at the same time (ask Cathy).

Steve Resin, my flight instructor, was surprised that I had trouble with landings. He said he never had a student who could fly an airplane right from the start like I did. When I attempted landings though, everything turned into a blur during the critical seconds of the landing flare. That was one good reason to have a flight instructor.

You don’t sit in the middle of a Cessna (or most trainers). That’s what made landings hard for me. Judging if the airplane is lined up straight is like trying to catch a baseball behind your back. It took so much concentration that I had nothing left for the other tasks. Steve helped me through lots of landings, and soon they were one of my favorite parts of flying. I know now that I could have worried less about alignment. I could have relaxed a little, and let the forgiving little airplane help straighten things out.

152panel
152 Instrument Panel and Controls

It helps to be an engineer when you’re learning to fly. Navigation, weather, navigation instruments, flight planning, aerodynamics, etc., are easier to work with if you have good math skills and a feel for physics. Also if something goes wrong, you’ll have a better chance of figuring out what to do instead of panic.
That’s particularly true for navigation. It also helps you get 100% on the final written exam.

Navigation is a big part of a pilots training. It’s easy to get lost when you’re flying. Everything tends to look the same once you lose track of where you’re at. If you’re only off by a couple of miles you may not be able to find where you’re going or even find your way back. That might ruin your whole day. You could even end up dead. All airplanes have a compass, but it’s not good for much more than a sanity check on your primary navigation. You need sound navigation skills and discipline to be a safe pilot.

The most interesting flights I had were on windy days. The wind was blowing at 25 knots straight down the runway on one of those days. With that wind, Steve thought I should be able to land and stop on the numbers. The 150’s stall speed, which is also the touchdown speed you’re shooting for, is 35 knots. If I could get everything right the ground speed at touchdown would be 35 minus 25, or 10 knots (12 miles per hour). The letters are about 50 feet high, so it should be easy to get stopped on the numbers. I managed to do it. A couple of times.

On another windy day, there was a strong crosswind at Spokane International Airport. I was flying with the chief instructor that day and he wanted me to try some extreme crosswind landings. You do that by keeping the upwind wing down with the aileron, using whatever rudder position is required to force the airplane fuselage into alignment with the centerline, and then planting the upwind wheel on the runway. Now you can let the downwind wheel touch the runway too, all the while slowing the airplane down and keeping it on the center line. I did a half a dozen of those landings, all of which went well.

Cross country flights test most of your flying skills. You make several of these flights in your training. As I remember, one cross country must include landing at two other airports, separated from your starting field and each other by at least 50 miles. I landed, taxied back to the runway, and took off right away from the first airport. At Walla Walla, I had to pee badly. That was a problem. You can’t just leave the engine running while you hop out and find the men’s room. But the starter wasn’t working on that 172. You’re not supposed to start your airplane by hand unless there is a pilot at the controls. Oh, bother.

My plan was to tie the tailwheel to a tie-down ring, set the engine controls for starting, hand-prop the engine to start it, reduce the engine speed to idle, untie the tailwheel, get in the cockpit and go. I’m sure that would have worked. About the time I had the tailwheel tied down and the engine controls set, a grizzled old pilot approached. Might have been an Alaskan bush pilot. He asked if I had trouble. I said yes, the starter is not working. He told me to get in the cockpit, and he would prop it for me. Mighty nice of him.

Learning to fly kept me absorbed in flying, but after I had my license, recreational flying seemed like recreational sailing to me. In other words, I found it boring. The 152 was more fun to fly that the 172 because I felt more like part of the machine. But the smaller, responsive airplane was not enough for long. What I really needed was something like sailboat racing to make flying fun again. At that point, serendipity stepped in again. More to come.